My biggest bookcase build yet!
January 19, 2021
Share this
Soooo, remember last week when I shared
the projects I was hoping to tackle this year
and I didn't mention this big one? Yeah. 😂 I planned to start
this HUGE built in project later in the year, but then I realized we spend
more time in the basement in the winter...so why not get it done now?
And when I started figuring out materials I discovered we had money in the
budget to at least get this project going. It helped that the cabinets I
needed were on sale!
I've built a few versions of these
built ins using kitchen cabinets
many times before. I'm telling you...using cabinets makes this SO much
easier (and quicker) than if you were to build those yourself. They are
awesome!
This side of our basement family room has looked great for awhile:
I think I've only shared the other side of the room once because it's just a
loooong wall:
This post may contain affiliate links for
your convenience.
See my policies and disclosure page for more information.
I just hung a few things up there two weeks ago...and now I'm going to take
them down. Sometimes I really plan out when I'll start a project and
sometimes I jump right in. This one is the latter. :)
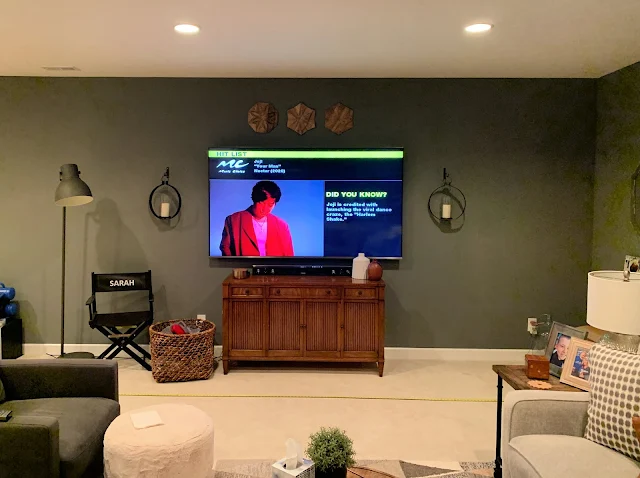
The wall is SO long, so I've known since we moved in what I wanted to do.
Sorry for the bad quality, I didn't have great light when I took
these:
The ginormous television is courtesy of my husband. I would not have picked
it, but I do secretly love it.
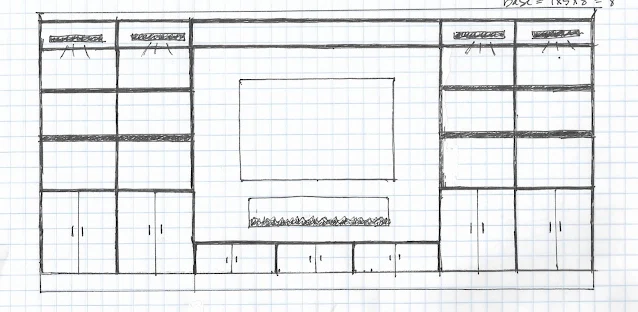
When I thought about starting this project the other day, I sat down with my old
school graph paper to sketch out my plans (trying to keep things
proportional):
Oh, how I LOVE doing this! It's one of my favorite parts of DIY projects. I
love sitting with a pad of paper and mapping out my ideas. This will be my
biggest build yet! Before now the longest I've done is 12 feet.
Before I could start the build process, I had to remove the
baseboards:
To make these more custom looking, you'll want to get the cabinets off the ground a bit. You can do a toe kick like in the kitchen, but instead I like to wrap the fronts with the baseboard and tie them into the rest of the room (this is why you want to save the base) so it looks like a custom built in.
You can see how I
remove baseboards without damaging the wall here.
I'll be using these again, so I removed all of the nails and caulk:
To make these more custom looking, you'll want to get the cabinets off the ground a bit. You can do a toe kick like in the kitchen, but instead I like to wrap the fronts with the baseboard and tie them into the rest of the room (this is why you want to save the base) so it looks like a custom built in.
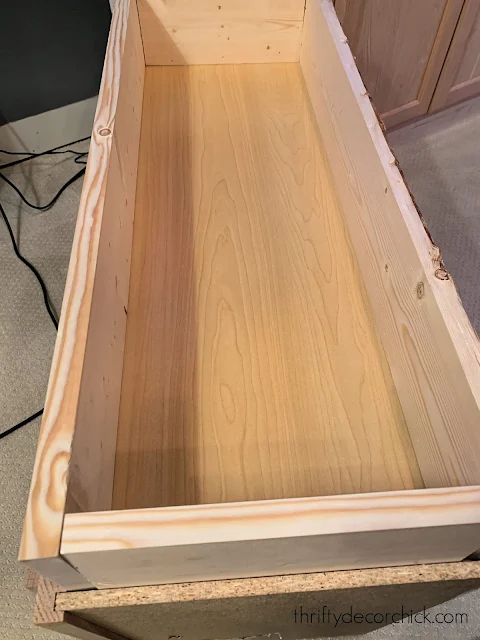
To do this, you'll need add wood braces under each cabinet. I always use the
most basic pine for this part of the project.
Just wrap the inside of the base to raise up it up a bit -- I nail them into
the front, sides and back of the cabinet. The size of the wood will depend on the height of your baseboards. I want the baseboards to sit on the front of the cabinets instead of
underneath:
I used 1x5 boards for that part and it works great! Btw, the only place I've
found the five inch height (which is really around 4.5 inches) is at Home
Depot, but again, your size will depend on your baseboards.
You can find these unfinished cabinets at almost any big hardware store. It's
SO great that you can order online now and they will bring them out to you!
Are these the BEST quality? No. But they've always worked wonderfully for us
and they are easy to dress up with paint and hardware. I may make new
doors for this project...I'll decide on that later.
After the supports are on the bottom, it's time to start placing your
cabinets. When you get them set in place you can figure out where you need to create access to the outlets. Measure where your outlet is on the wall and then
mark those measurements on the back of the cabinet to cut it out:
I still have to drill a few more holes and cut the back off of one cabinet
(more on that later), but they are ready to be installed into the wall!:
It's a BEAST! But this wall is long so it needs something substantial. You
can see how I'm pulling the middle cabinets out a bit to make a bench --
those are the
18x30x12 cabinets. The others are
the 30x30x12 size.
I would have these installed and counters on by now, but we have to wait
to have sconces wired. They will be at the top of built ins like I usually
do. I could do the
non-electrical lights
like I did in my office, but I'd like to have something a little brighter
that we can also dim while watching TV. If you have an outlet below, it's
almost always possible to add sconces above!
As soon as those are wired I can install the cabinets, get the countertops
and baseboards on and then start painting. Then this part at least will be
usable:
I've already had to switch gears on a couple things since I drew out my
plan. You may notice that I had a fireplace that was supposed to be
installed under the TV. We thought we'd have room, but with the TV speaker
it just won't work.
So I was able to use taller cabinets for the bench in the middle instead
of the 12 inch versions I planned to use. This is a much more comfortable
height for a bench and the proportions just look better. We think we found
a new spot to do the fireplace someday, so I hope to share more about that
soon!
I'm getting good at this project! If I didn't have to wait for electrical
work to be done I could finish this up (except paint) in a week! But I am
forced to be patient, which is better for our bank account anyway.
;)
My first DIY bookcase took me about eight months and my Dad helped with
most of it. My office took about six weeks...and this one I think will
take about half of that. I'll share a few of my past built in projects
below! Hopefully I'll have more progress to share with you soon.
**See the next step in this build here!
You can read all about the
dining room turned library bookcases here:
We used them to
hold sound system stuff here:
And finally my
office built in bookcases here:
See more of
our home here.
To shop items in our home,
click here!
Never miss a post by signing up to
get posts via email.


Love seeing you back in the DIY groove and these are going to be phenomenal! The size alone is eye-catching!
ReplyDeleteIt’s going to be fabulous!!!! Can’t wait to see the finished look!
ReplyDeleteSo excited to see the finished built ins. I am kind of sad that the fireplace had to go. I actually replicated your built ins with some modifications and get tons of compliments on them.
ReplyDeleteI love hearing that! I'd love to see a picture!
DeleteCan you link me to directions for how to close in the top of these shelves? I built some using your methods (AMAZING), but can't figure out how to close up the tops. Thanks!
ReplyDeleteYep! You can see how I did that here: https://www.thriftydecorchick.com/2019/06/diy-office-built-ins-step-four-how-to.html
DeleteThis is going to look amazing. I'm always jealous that is seems like your cabinets always fit perfectly. I have a 71" space on both sides of my fireplace. A 72" (two 36" w pieces) would be too wide. If I go with smaller cabinets I have a large awkward space between. How do you work with managing those "in between" spaces? I'd love any feedback. Thank you!
ReplyDeleteThey do sell spacers (or you could have some cut) that would go on either end...or do one on each end and one between each cabinet. So if you did two 30" cabinets, you could do a 3.5 inch filler in each of those spots. That would look great!
DeleteOr you can do what I did in the family room and build open shelves as well: https://www.thriftydecorchick.com/2018/04/diy-bookcases-by-fireplace.html
You are such a good built-in designer/maker. This is going to be as awesome as all your other amazing ones. All that storage is going to be awesome, too!
ReplyDeleteWow! That is some project! Nice!!
ReplyDeleteFabulous! I did flanking bookcases on either side of my fireplace. Wall cabinets for the base. Pretty made shelving for the upper shelves. Face front all and added trim and baseboard. I love them.
ReplyDeleteI am inspired.
ReplyDeleteI have a 10' wall...
All of your built-ins look really nice!
ReplyDeleteI also like the color of the paint that you chose for your basement. Can you tell me what the brand and color of that paint is?
Thank you!
Thank you! It's called Westchester Gray and I believe it's Sherwin-Williams.
DeleteThanks so much for responding! I'm really wanting to change up my paint colors, and it's nice to be able to put names to colors I like when I see them. Thank you for your help with that! 🙂👍
DeleteLove seeing this. A question that I have is, are you installing these cabinets directly over the carpeting? Thanks.
ReplyDeleteWe did your kitchen cabinet trick in our music room in the basement, but little did we realize the whole basement floor was sloped towards the drain (a whole room away) so it was trickier than we thought- we needed professional help. They turned out great though!
ReplyDeleteYou basement looks amazing!! I love how big your couch is! Can I ask where it is from and what color? I think it is the Radley from Macy's. What color did you get and has it held up well?!
ReplyDeleteHi! Beautiful job. Can you tell me what you use for the horizontal wall boards that you use in so many of your projects? How do you attach to the drywall?
ReplyDelete"I was able to use taller cabinets for the bench in the middle instead of the 12 inch versions I planned to use."
ReplyDeleteWhat size did you use for the bench? Thank you so much for posting your project. My husband and I are planning on doing this in our living room.
I believe those were 18 inches!
DeleteThis looks fabulous and I am using it as inspo! I may have more questions and hopefully you will see my comments but what type of nails and nailer did you use for the bases. Was it just a brad nailer?
ReplyDeleteThank you! I use an 18 gauge nailer, but screws will work as well.
Delete