DIY Sliding Shoe Storage for the Mud Room
January 23, 2025
Share this
How to make DIY sliding shoe cubbies for the mud room!
These sliding shoe storage boxes were an easy fix for one of our problem areas!
We have a great bench in our mud room/laundry combo with a ton of space, but it was lacking a spot for us to toss shoes on the way in the door.
It was a spot that bugged me since we moved in:
I started some mud room updates last year and added the shiplap wall, no sew cushion and long pillow. It made a huge difference in here and I LOVE this half of the room!
The only part that bugged me were the baskets underneath the bench. I used what we had when we moved in, but they drove me absolutely crazy. They shed everywhere and didn't hold their shape.
I knew I'd build something eventually to replace them. It's pretty complex though...get ready for this super elaborate DIY.
I built...a BOX:
This post may contain affiliate links for your convenience.
I may earn a small commission when you make a purchase through links.
See my policies and disclosure page for more information.
Ha! Well, two boxes.
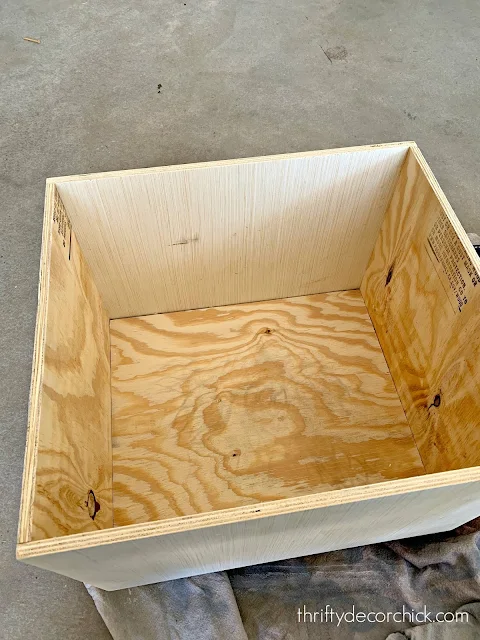
You'll notice I used inexpensive, low quality plywood for most of this build -- because it holds shoes. Dirty shoes. I don't need the inside to be pretty. :)
Once you get the measurements figured out, building one is super easy. It's figuring out the exact dimensions that takes the longest.
I had my wood cut down at Lowe's and that made this go super quick. My shoe boxes are 14 inches tall and 20 inches wide, but of course if you try this out you'll want to make them to fit your space.
I didn't use jigs or anything -- just nailed it together with my nail gun and it's super sturdy. I laid the bottom piece on the ground, then surrounded it with the sides. (You can see how I constructed it if you look at that pic above.)
I made the front and back pieces wider (20 inches) so they cover up the rough edges on the front.
I used a nicer, paint grade plywood for the front panels so it would paint up nicely. After a few coats I put them in place and realized they definitely needed a little something:
They were functional but super boring. :)
My thin lattice trim molding to the rescue! I painted some scrap that I had in the garage and did a simple frame around the front. Be sure to check out all the ways I've used that lattice trim over the years!
After that I added a long, heavy duty handle to the front of each shoe box...and they were done!:
I wanted them to look as built in as possible, so instead of wheels I put a few large felt pads on the bottom:
They slide in and out super easy because our tile is so smooth. (I tested that out before building them -- if you use wheels remember you'll have to adjust the height of your boxes!)
At first I was worried they wouldn't hold as many shoes, because we could stuff so much in the baskets. Turns out these are HUGE and hold plenty!:
No, I didn't paint the inside. We're the only ones that will see in there. Pick your battles my friends! :)
They turned out even better than I had envisioned! And they are SO super functional, I'm so happy to have those baskets out of here!:
The handles actually work great, because nine times out of ten I'm using my feet to pull them open and closed. 😂 If you would do the same, make sure to get long hardware for the front.
SO. much. cleaner. Achieving both form and function always makes me happy!:
They only took me a few hours total -- I wish I would tackled this way sooner.
These would also be a great option for under the bed storage! Just use carpet sliders underneath instead of the felt. :)
Here are more details about this room if you're interested:
- no sew bench cushion
- long lumbar pillow fabric -- Joann's
- DIY shiplap wall
- wood framed mirror
- cubby canvas bins -- Hobby Lobby
- black and brass sconces
- long black hardware -- Lowe's
Check out this huge laundry/mud room makeover here!:
Never miss a post by signing up to get posts via email.


Those look great!! Brilliant idea! If you want to be super fancy, line them with contact paper so they could be wiped clean inside. Toss in a couple dryer sheets to deter smells. :)
ReplyDeleteVery nice and gets the job done!
ReplyDeleteWow! Amazing! Looks totally custom and high end, the handles are the icing on the cake!
ReplyDeleteThis is amazing! Great job!!! I’ve been meaning to ask, do you break down how you built the wood counters for your built ins in the old house or this house anywhere? I think I want to join together some lumber with pocket screws, but I’m wondering if they will warp over time since they aren’t kiln dried. Any issues with that ever?
ReplyDeleteThese look super great! I love them. I really like the idea of using the felt pads on the bottom, but our house gets so dusty so quick, they would be trapping dust bunnies in no time!
ReplyDelete