Our Outdoor Living Space: The Patio Reveal
August 13, 2019
Share this
Hey there! It's patio reveal day! I've been working so hard on this outdoor space and I'm excited to share it with you!
There's still so much we want to do out here (most of it is landscaping -- TREES), but wow, we are in love with it!! We've had two friends say it looks/feels like it was always there to begin with, which is the ultimate compliment.
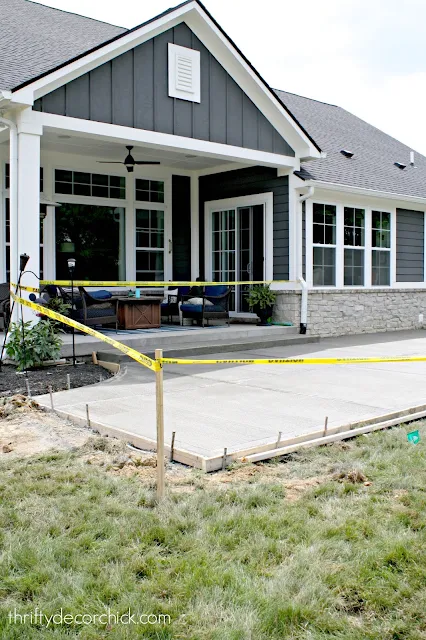
You can see the patio right after it was poured and all the reasons we went with plain, basic concrete here. We're already so happy with the upkeep, I can't even tell you how nice it is to just take the hose or broom and clear it off when we have company. Even that isn't even needed much. It's been a DREAM as far as maintenance so far! We did find out it should be sealed once a year, but compared to stamped, aggregate or wood, I'll take it!
OK, onto the pics! I took WAY way too many. Couldn't help it. I took all of the pics at my favorite time of day -- dusk. I love the moody feel of that time in the evening.
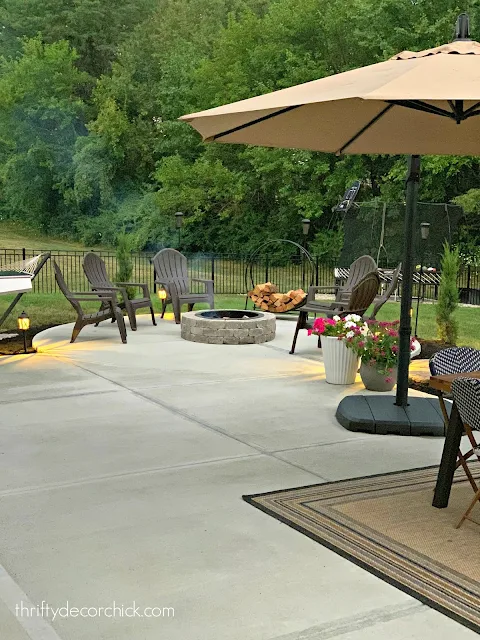
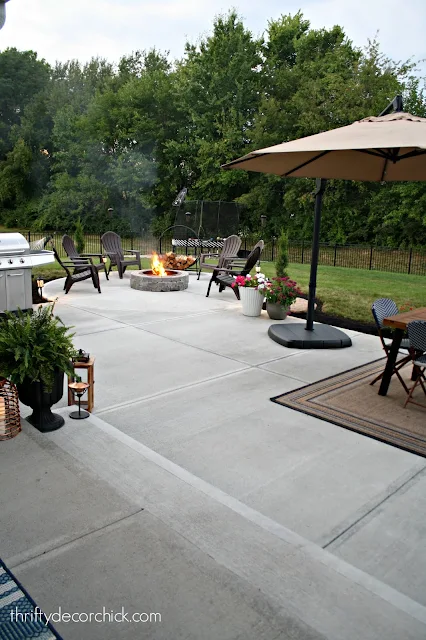
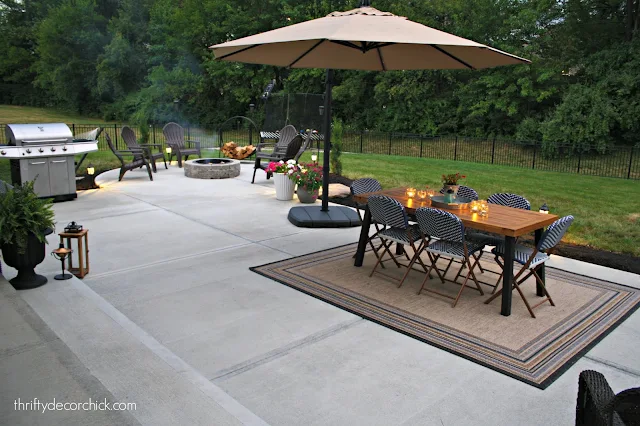
I think our favorite spot this fall will be the round fire pit area. I designed the patio so that spot felt separate, but still connected to the patio:
We haven't had a night around the fire yet -- we did this one for my photo shoot (and to test out our fire building skills since it had been awhile!). It got warmer and stickier at night right when I finished it, so we'll have to wait a few more days.
You can see how I built the fire pit here -- be sure to check that out for the things you need to add to make it safe.
I've always wanted one of these circular wood holders! I was so excited to finally get it:
My vision for this spot has always been a circle of Adirondack chairs, but GOODNESS they are so expensive. Especially because we need so many. So for now, I found these plastic versions at Lowe's for half off:
The timing was great as far as finishing up the patio -- so much was on clearance! I found all the planters weeks ago at At Home and HomeGoods for great prices. The Adirondack chairs were $12 each:
Someday we'll probably replace them with wood, but for now these work! And they're super easy to stack up and store for the winter:
I placed the arching umbrella and table on the long part of the patio:
So far I'm thrilled with the outdoor table I picked! It was great price and looks great! I would totally use this table inside by the way.
Those chairs from Target were not cheap but I fell in love with them!:
They were a splurge for sure but they are holding up great and again, will be so great because they fold up for winter storage.
This post may contain affiliate links for your convenience.
See my policies and disclosure page for more information.
The wood table will age with time I'm sure. I'll probably put a protective coat on it soon to preserve the pretty stain though. I'll let you know how it holds up over time!:
We got that large umbrella years ago at Lowe's (I'll link a similar one below) and we LOVE it. When we had a table with the umbrella in the middle it would always get scooted around in bad weather (even when down) and was always a mess.
The main part of the patio is about 15 by 30 feet and the fire pit circle is 14 feet across.
We prefer this one because it's SO big! It was protected from a lot of wind on our old patio, so hopefully it will do well here. So far so good! It's already been through a couple storms out here:
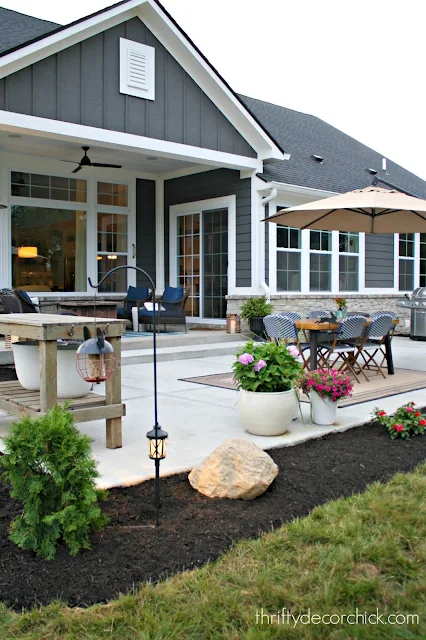
One of my favorite things about the patio is the loooong step we had added off of the covered porch:
Just that simple detail makes it feel more grand. And it makes getting down to the new patio even easier:
It was SO nice to get the garage emptied out after two years! And fun to see items we've had put away for all that time. I'm so happy to have my DIY potting bench out on display again (I've been using it as my work bench in the garage since we moved in):
I built that with my Dad and it's one of my favorite pieces in our house! I have a couple fun little updates planned for it soon. :)
Some of you will notice we went with mulch instead of rocks. I planned to do rocks so we wouldn't have to redo the mulch so often (I hear it's more money upfront but you save big time over the years). A friend gave me an important warning about that though and I'm SO glad he did.
He said certain plants won't grow well (in our summer heat) because the rocks heat up so much. I didn't even think of that! One of my favorite plants are hydrangeas, and they are one that wouldn't do well in it on our hot days. Sooo we went with mulch instead. I do love the look of it!:
We'll extend the beds out in certain spots as we plant more trees. We plan to add a bunch more...mostly evergreens for privacy. I don't want it to get too disconnected from the rest of the yard though, so I want to take our time and do it right.
We already have some on order for behind the potting bench, but the rest will wait. I already found three small evergreens and two knock out rose bushes on MAJOR clearance and planted all of those. They are all small, but I only spent $70 for $350 worth of plants!:
All of the potted plants on the patio were the same -- I found them all on big time clearance!
Yesterday I finished up the landscape lighting -- for me no outdoor space is complete without it! I've shared how to do it a couple times, but this DIY landscaping tutorial should help the most!:
Once you've done it a couple times, it's even easier to do. I was able to get all of these laid out and connected in 30 minutes. (It sounds like a big DIY with major skills needed, but I promise you, it's not!) The most time/work goes into digging the wire into the mulch!
OK, I think I covered everything! If I didn't let me know!
Here's a look at the patio a few weeks ago right after it was poured:
Next up are a few more trees and then stringing the outdoor lights like we had over our old patio. I can hardly wait!
Source/project list:
Wood outdoor dining table
Fold up patio chairs
Build your own potting bench
Outdoor rug on covered patio
Outdoor rug on patio, Lowe's
Similar arching umbrella
DIY landscape lighting tutorial
Circular wood holder and cover
Similar large deck box
DIY firepit tutorial and sources
Landscape lights -- Lowe's
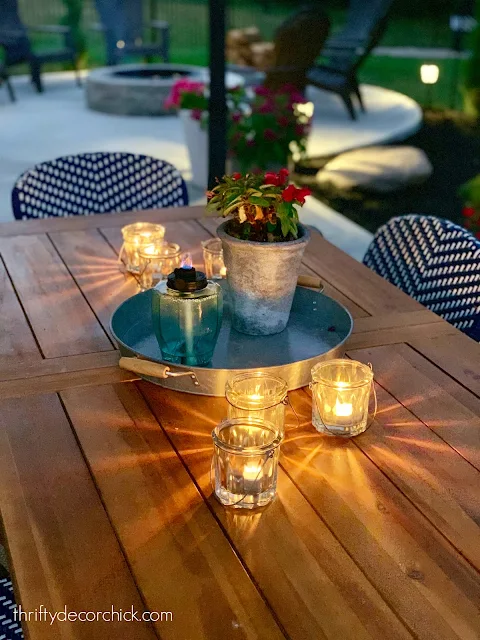
Similar galvanized tray (on major clearance right now!)
See more of our home here. To shop items in our home, click here! Never miss a post by signing up to get posts via email.








Looks beautiful! Such a difference and a perfect set up for outdoor entertaining!
ReplyDeleteI have my hydrangeas in rocks and they have done great for the last 6 years. I believe it’s the color of the rock that matters. Ours is a brownish rock with many different shades in it. A grey rock would work too. Black rocks are a no no. We are in northeast Indiana
ReplyDeleteGood to know! He found out here locally that it didn't work well for them, so I wasn't going to take a chance!
DeleteYour backyard looks amazing! We just recently updated ours as well so I was glad to see you also added a firepit. Ours has been the hub of our backyard with the neighborhood kids. I am also using plastic adirondack chairs for now but will be getting Trex or Polywood once we recover a bit from all the other expenses. You are right about them begin expensive! I am sure you are enjoying all your time spent outside in your beautiful new living space! Cheers!
ReplyDeleteShelley
Your patio looks like such a peaceful retreat! Do you know what size your umbrella is?
ReplyDeleteThanks!! I don't know the size but it's definitely bigger than a normal table umbrella. :)
DeleteSimply gorgeous!
ReplyDeleteBeautiful!! I am all for low maintenance, I love the concrete. You should consider making your on Adirondack chairs- I wanted some for my new house this year but everything was sooooo expensive. I got some free plans online (Norm Abrams plans from the New Yankee Workshop, but Ana White has some really easy ones too) and built my own out of cedar. They are super comfy, look fantastic and were pretty quick and easy to do with my middling woodworking skills and a few power tools. It is a very forgiving project. They came in at well under $100 each, too. Other wood would mean less expensive chairs but more maintenance. I did finish them with a transparent stain. Love your blog, you are inspiring!
ReplyDeleteI've never considered it but you have my mind going! I may have to look at plans!
DeleteWould you mind sharing your exterior paint color? The outside looks gorgeous and inviting - great job!
ReplyDeleteThanks so much! It's called Knight's Armor.
DeleteWow! Great job!! I LOVE those chairs and the fact that they fold up is such a bonus. Hopefully they hold up for years and years.
ReplyDeleteWe have to redo our back deck because the deck wood we bought from Lowe's 4 years ago is already rotting. We've learned our lessons and we're going to do pavers next time.
Have a lovely day!
Kim
Love the new patio and the furniture. I agree with one of the comments about you building your own chairs since you are so handy with the power tools.
ReplyDeleteOne question about the step - are you going to add rails for safety purposes? I painted the edges of my porch steps because my mom had difficulty seeing the edge. And, you could get more planters, weigh them down with gravel, get a decorative post or two as the place to steady the hand, add plants and some lights. A friend did this for her mom to help her up the few stairs.
Liz
Thank you! :) We won't be adding any rails. I prefer having it open and it's not needed per code.
DeleteLook beautiful! Costco has the best price on Adirondack chairs every spring!
ReplyDeleteWhat a beautiful outdoor area, you are going to love it. I was wondering about the light that you have in the woodchips with the shepards hook. Is that hardwired with your other lights or is it solar? Love it!! We built a patio 3 years ago when we remodeled and tore out an old deck. I love the patio more than I ever thought I would for various reasons, some of which you mentioned. We also have a fire pit (YEAH) I ordered four poly resin adirondack chairs and what was delivered were rocking chairs. I didn't think that was what I wanted but they said to go ahead and use them for the holiday weekend. LOVED them so much we kept them! Saved my pennies (dollars) and ordered two more the next spring.
ReplyDeleteThank you!! :) Those are landscape lights -- I included a link to that project in the post if you'd like to check it out!
DeleteYou might not be able to get to this question, but what are your thoughts on a pergola on the FRONT of a house? We converted our garage into a master bedroom, so we have a concrete area going straight up to the wall of our bedroom and there's a bay window there now. We can't decide if we should rip up the concrete or put a pergola over it! Do you think it would throw off the "balance" of a house to have one out front on the far right side of a house? I CANNOT FOR THE LIFE OF ME MAKE A DECISION ON THIS!! ;)
ReplyDeleteOh I would totally do one on the front! I've seen it done many times beautifully.
DeleteAbsolutely beautiful! Such a great space for hanging out with your family. I would love to entertain there!
ReplyDeleteIt is always nice to have a lovely outdoor space to enjoy relaxing in nature. It looks great!
ReplyDeleteWhat a fantastic job! Congratulations.
ReplyDeleteLooking beautiful but I am not surprised as you have a gift! �� I wanted low maintenance but also needed weight because of wind. I wanted polywood Adirondack chairs so I wouldn't have to worry about upkeep. The only type I found that weren't rickety IMO were the heavier duty style and Amish made. They had a lighter weight which was the same as most everybody else's. I wanted more weight and those heavier weight ones were $300! Yes, each! However, I finally decided I would go for it. So glad I waited! Costco had the polyeood and was a nice weight, too, for $120 or $125 each. Sorry, can't remember exact price. They had them online, too but those were $140 which included delivery. So worth it. Unexpected purchase but thankfully had the money and grabbed 4 immediately. Have room for 6 but will probably just keep the 4. I shared the info with two other couples and they immediately bought 2 each. We all love them. Sorry to ramble but I love them!
ReplyDeleteApparently I can't proofread very well. Plz excuse typos!
DeleteHi’ do you have a tutorial for the long concrete step?! Did you hire out or DIY it? Hubs and I are looking into expanding with a ground level patio and we feel the same way/ definitely want to connect our covered patio space with the ground level and love the look of your long step- it looks so custom! Thank you in advance
ReplyDeleteWe had the concrete company add it when they put in the patio. I love having the one long step!
DeleteHello -- new here but this is gorgeous! I'm in the process of deciding between concrete ($) and pavers ($$$$) to do a similar extension of my patio. I was concerned about the wear and tear over time (i.e. cracks). Any thoughts or advice you could share? I know its been a year, but any regrets on going with concrete?
ReplyDeleteWe have a few very minor cracks, but from what I hear that's normal. I would 100 percent go with concrete again! Spend that money on other fun stuff! :)
DeleteWhat are your patio dimensions? I am looking to do something similar to yours but wanted to get an idea of how big your patio area is. It looks beautiful! Thank you.
ReplyDeleteWhat diameter is the circular section?
ReplyDeleteI think around 12 feet.
DeletePlease say more about how the umbrella in the middle of the dining table got "scooted around." We are thinking of getting an umbrella like that, and we do have frequent breezes and occasional very high winds. thx!
ReplyDeleteLOVE this! We are planning to do almost the exact same thing to our outdoor area to replace two wood porches with concrete. This layout is the inspiration I needed...thank you!!!! Would you be able to share the cost of the concrete? We're looking for companies to come out and quote us but curious to compare it to what this cost you! Thanks
ReplyDeleteI love this! Can you let me know what size the circle around the firepit is and the dimensions of the rectangle portion of the patio? We recently gave this exact layout to our builder and were having troubles visualizing it. I love how it looks for you and hope it turns out this nice for us too.
ReplyDeleteHi - Curious what the dimensions are for your patio? Specifically the firepit area. Looking to do something similar in our yard! Thanks.
ReplyDeleteHey we are getting our patio done and live the layout of yours! Do you have dimensions of patio or at least the fire pit area?
ReplyDeleteSorry I missed your comment! The fire pit area is about 14 feet across.
Delete