EASY DIY Wall Mounted Butcher Paper Roll Holder
October 18, 2018
Share this
How to make your own wall mounted butcher paper dispenser for WAY less!
If you've ever admired the cute kraft paper dispensers online and wanted one for yourself, this easy step-by-step tutorial is for you!
This quick project goes to show how much money you can save when you DIY. Many times it makes more sense to just buy an item, rather than do it myself.
But with this one there was just no question. I saved a ton, even comparing it to less expensive options!
I was looking for one of those kraft paper roll holders that are so cute -- you can pull the paper down and write the grocery list or meals for the week.
I wanted to hang it in our pantry:
We have the big blackboard nearby in the mud room, but I wanted something smaller right in the pantry for easy access.
I searched online for something to buy, and found one I LOVED...for $150. ONE HUNDRED and FIFTY. Nope.
I kept searching and of course found others that were less, but they were all more than I wanted to spend. It's not a super complex thing!
Then I found this great tutorial using a black curtain rod and followed it almost exactly. This is a very inexpensive DIY project!
Most of my supplier were from IKEA, but if you don't have one nearby check out the bottom of this post:
This post may contain affiliate links for your convenience.
I may earn a small commission when you make a purchase through links.
See my policies and disclosure page for more information.
I used the following IKEA items for my paper roll dispenser (all of these items are available in both black and white):
Two Betydilg brackets
Two Raffig finials
One Racka rod
I used this 18" width kraft paper roll as well. You can also find these at the paint section of a hardware store.
Be sure to check the size of the center of the paper roll, I had to use the smaller diameter Racka rod. Anything bigger wouldn't have fit through the paper roll.
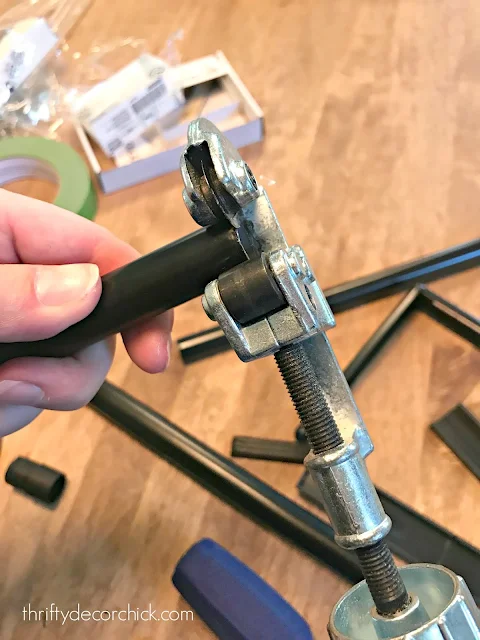
To cut the IKEA rod down to size you will need a pipe cutter. I've had this for years and use it more than I ever thought I would! This is the handheld piper I use or you can find them at the hardware store.
You can also use a wood dowel rod instead of a curtain rod!
You just tighten the cutter down on the pole and then rotate it around:
Every couple of turns you tighten it and it eventually cuts through the metal. Super easy! I showed you the other ways I've used this handheld pipe cutter here.
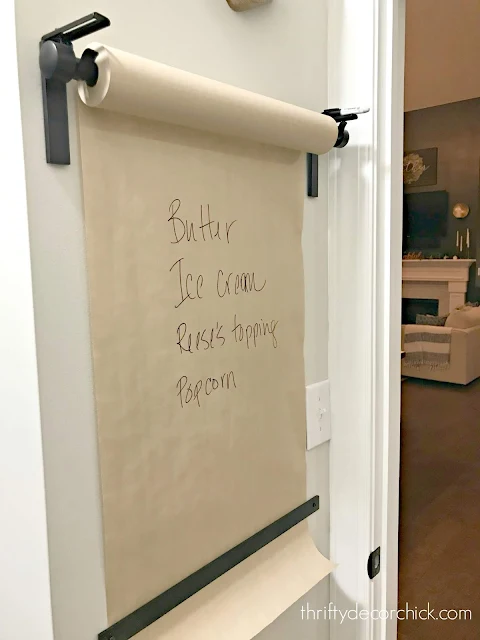
I hung my brackets (using a level to make sure they were the same height) and hung my rod. Then make sure to attach the drapery finials so the rod doesn't fly off when you roll the paper:
Cute right?? Not bad for $11! If you purchase from IKEA makes sure you get the smaller (diameter) Racka rod. Anything bigger wouldn't have fit through the paper roll. And I'm laughing at our list right now...I swear we eat real food. 😂
The one thing I added that the original tutorial didn't have was a bar across the bottom to hold the paper against the wall. The expensive version I saw had a metal piece that you attach.
The more expensive versions of these paper holders have a blade across the bottom to tear the paper. Instead I just grabbed a scrap piece of wood, spray painted it black, then hung it on the wall:
We're able to just pull the used paper off at the bottom and it makes a clean cut.
What you don't see here is I put two washers behind the wood so it sits away from the wall just a bit. That allows the paper to move freely behind the peice of wood.
I hung a Sharpie marker from one of the brackets, and it does not bleed through to the wall. For kids you could hang a pencil or crayons instead.
I LOVE it!!:
Since I first made and shared this, yes, I've taken the sheet off and brought it to the store. But most often now, we order our groceries for pick up or delivery, so this is more helpful than ever!
And if we only have a few items, I'll take a photo with my phone and take the list with me that way.
The best part is these brackets are adjustable so if I use a thicker roll I can move them away from the wall a bit.
If you use a heavier roll of paper, be sure to use sturdy wall anchors with your screws when attaching the brackets.
If you don't have an IKEA nearby just look for similar brackets that you can move. These adjustable drapery bracket sets will work as well -- the IKEA version is just a bit cleaner looking.
You can use this easy paper roll dispenser for so many uses!:
- Hang gift wrap for easy access -- I made a similar gift wrapping wall station years ago.
- Use a longer rod and wider rolls of kraft paper to create an art station for the kids. Perfect for a playroom!
- Hang a few in the pantry to dispense foil or plastic wrap. (You will want some kind of cutter for the plastic though.)
- Use this wall mounted roller in an office to write down ideas or to do lists.
- A reader suggested hanging the brackets under a decorative shelf -- what a cute idea!
Cute right? Functional, easy and cheap too! My favorite combo. :) Have you tried making one of these wall mounted paper holders?
Never miss a post by signing up to get posts via email.


Genius! I love how raw the paper board is as well. Would definitely suit the aesthetics at some houses!
ReplyDeleteCharmaine Ng | Architecture & Lifestyle Blog
http://charmainenyw.com/
Really cute idea but now I am thinking I need to be getting Reese's topping. Do I need to be getting Reese's topping? What IS Reese's topping??
ReplyDeleteHaha! It's SO good! It's like that hard shell chocolate stuff, but REESE'S and chocolate.
DeleteThis is AWESOME! Now I have the idea to hang it from a little blackish stained shelf, just attach those brackets to the bottom...My imagination is flying...Thanks for the inspiration!!!
ReplyDeleteGREAT idea!!
DeleteOh how fun and so cute too !
ReplyDeleteThanks for sharing this great tutorial !
Fabby
Are the brackets metal? Could a magnet stick to them? Maybe add a small magnet to your sharpee so it can stick to the bracket?
ReplyDeleteYes they are! Good idea. :)
DeleteI made one too with an old curtain rod and brackets! It's so fun! I use my butcher paper for all kinds of things (besides lists)! ha! looks great sarah! laura in CO
ReplyDeleteWow, great price!! It appears large, not like something you would tear off to take to the store? I guess kind of hard to tell.
ReplyDeleteIn any case, cool beans, and thanks for sharing. Chrissy