
DIY Seasonal Pillows From Placemats and Table Runners
August 12, 2024
Share this
How to make fall and holiday pillows for WAY less with placemats and more.
One of my all time favorite DIY projects is making pillows from placemats, table runners and all kinds of random linens.

This little trick is perfect for fall and holiday pillows. I mean, who wants
to spend a fortune on pillows that will only be out for two to three
months?
I've shared this little hack a few times, because it saves me so much money.
The investment is in my time, but I'm so quick at these now it doesn't take
long at all.
I like seasonal decor that can be used more than a couple weeks and that's
easy to store away. These always fit both of those criteria. OH, and cheap.
Also checks that one off.
I always love the Pottery Barn selection of fall pillows, but they are like
$30+ each for just the pillow covers. When I want one, maybe.
When I want a bunch, no way.
Years ago, I started looking at other ways to get the same look, for way less!
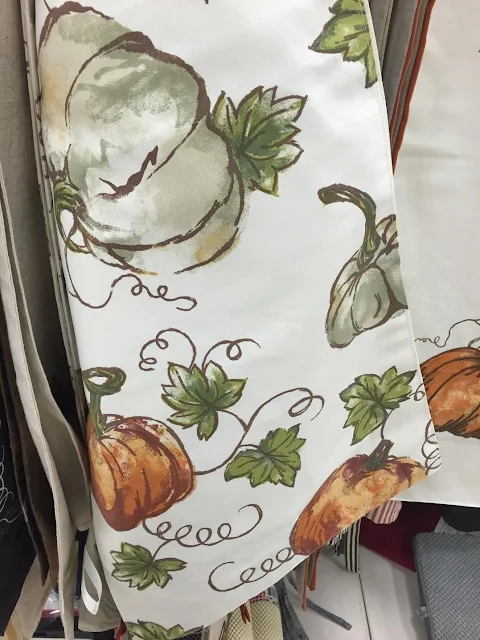
I found this runner at Marshall's (they have similar ones at TJ Maxx and
HomeGoods too) and my plan starting coming together:

This post may contain affiliate links for your convenience.
I may earn a small commission when you make a purchase through links.
See my policies and disclosure page for more information.
I've done this before with runners, but for more of a lumbar pillow. This one
had four designs, two longer ones and two at the end that were more square. I
loved that they were embroidered -- a little detail that makes them look a
little more expensive.

I measured from each end to make sure the design was centered. I cut them out
(making sure they were mostly square shaped).
Two of these designs were at the ends of the runner, so I only had to sew up one side!
You can close up that one side with a sewing machine or by hand. I usually do
a very simple hand stitch that will be easy to open up later so I can reuse
the pillow forms.
I used
these inexpensive soft pillow inserts. They are super squishy which is good because these are smaller
pillows. This runner was only 14 inches wide -- I knew they'd be smaller which
was fine with me. Keep your eye out because there are tons of runners that are
much wider.
A long table runner would make a great, large lumbar pillow for the couch or bed!
I may have squealed out loud when I started stuffing them with the
inserts:

I mean, come ON. That's adorable.
I love them!:
 |
| See how to make those teddy bear pumpkin pillows here! |
Check out my
tutorial on adding a zipper to a DIY pillow
to make them even easier to reuse!
I loved these Pottery Barn pumpkin pillows:


Have you tried this decor trick yet? If you aren't comfortable with a sewing
machine, ask around. If you have the materials ready to go it will literally
take minutes for a friend who sews to put them together.
I loved these Pottery Barn pumpkin pillows:

So I did some digging and found some super
cute Pottery Barn napkins
that had the same look, and some plaid ones with the same colors:

These were on sale so I got eight napkins for about $45. To me that's a lot
for eight napkins -- but it's GREAT for eight pillows.
By the way, I found this runner at Marshall's that looks SO similar to the
PB napkins and pillows:

You can find a TON of
beautiful pumpkin runners on Amazon
as well!
Usually I'll just put two napkins together and make them the same on both
sides. I wanted to make these really stretch so I used some inexpensive
linen I had as the backing.
It would also be cute to use two different placemats on each side so you
could flip them around for a different look!
I just traced the napkins and cut out the fabric for the back:

Place the good side of the napkin against the backing fabric, sew up three
sides, then turn it back right side out and stuff with your fill or
insert.
I'm so quick at pillows now it only takes maybe five minutes for me to do
each one. And I'm not an excellent sewer. Far from it. But pillows don't
have to be perfect, thankfully. Most fabrics are very forgiving.
I added inserts and then sewed up the last side by hand:

Because I had the inserts these cost me less than $6 each!
I love the more muted tones for this season. So pretty:

I leave these out for a few months and I'll use them year after year. This
DIY method is WAY cheaper, especially if you want a bunch of them! It was
funny because I told the employee at PB what I do with the napkins and she
did the same. Love it. ;)
You can see how I
make pillows with fall placemats here.
Adding the fall colors around our home this time of year makes me so happy.
This is the start to my favorite few months of the year!:

I know the sewing machine is intimidating, but it's not that bad, I promise! I
use a
Brother sewing machine similar to this one. Once you get the hang of it you'll be whipping out napkin pillows left and
right! :)
Go get yourself some napkins! Kitchen tea towels! Shower curtains! You can make pillows out of whatever textile you love.
Go get yourself some napkins! Kitchen tea towels! Shower curtains! You can make pillows out of whatever textile you love.
Never miss a post by signing up to get posts via email.
OMG ..... further than that I am speechless with your ingenuity !!!
ReplyDeleteBravo !
I love the pumpkin fabric! Gorgeous! :)
ReplyDeleteOf course you did!! So smart, Sarah! I gave the runner I got away as a gift and went back to get more...gone!! I should have bought them all when I had a chance. Oh well, gives me an excuse to keep checking ;)
ReplyDeleteThis is an awesome idea, thanks for sharing and I think it would be worthwhile to add a zipper at the end so that its less work when changing out the pillow inserts. Now to dust off the sewing machine and give it a try!
ReplyDeleteBritany and I appreciate your project. Super smart thinking and any project that great is worth sharing over and over again.
ReplyDeleteI love the prints on those napkins, what a great find! I found some great clearance placemats at Target this spring that I turned into pillows! It's such an easy project and so much less expensive than buying new pillows all the time.
ReplyDeleteDROOLING! So smart. Love the look for less...way less, haha! Love the white knit pillow too. Is that one a pillow cover you made before? And is the bench in the third photo new? I don't remember seeing it before and love it too! Great job!!
ReplyDeleteThank you! I got it a few months ago from HG. Love it!
DeleteI do this all the time thanks to you! FYI for those of you that don't have a sewing machine (like me). I use stitch witchery and hot glue. You can't even tell!
ReplyDeleteI have heard that from a couple people now! Good to know, I'll share that!
DeleteJust lovely! BUT where did you get that bench????
ReplyDeleteHomeGoods! Got it over the summer. :)
DeleteThese are the CUTEST & most festive pillows & BTW you're GENIUS!! Thanks for sharing blogger friend!
ReplyDeletePaige.Rose
from
www.TheQuaintSanctuary.blogspot.com
I also do this all the time now thanks to you! I have some pretty ones all ready to do for Christmas right now (got them on sale at Target last year).
ReplyDeleteSo CUTE!! I've been doing this for awhile as well .. once I abandoned zippers and Velcro and started doing the envelope style it got REAL easy! Best things about it, as I think you alluded to, are #1: always having the much more lovely feather inserts rather than the more common "polyfill" and #2: having only flat cases rather than tons of inserts to store for each design's "off-season"!
ReplyDeleteWhat did you use to close the opening for it to be a reusable pillowcase? I'm not one to remove stitches for each change.
ReplyDeleteJust a basic stitch that's easy to take out -- but it looks like I need to learn the envelope pillow!
DeleteLove love love!
ReplyDeleteThese pillows are so stinkin' cute! Amazeballs! From a runner? Really? I gotta go to Marshalls or Home Goods right now..... I want fall in my home! You are genius, Sarah! Great project. Thanks for sharing for the umpteenth time!
ReplyDeleteI do this too! Girl, you are rockin' some pillows! Beautiful!
ReplyDeleteOh MA word. If ever there was a reason to learn how to sew it's to make pumpkin pillows!! Gotta get on that... maybe by next fall!! (shame!)
ReplyDeleteIf you don't sew or know anyone who will happily and willingly do this for you, you can always bring your fabric to your local cleaners that has someone who does alterations. If you understand the dimensions, you can the cut fabric yourself ahead of time.. If you don't understand sewing dimensions and seam alllowances, just bring the uncut fabric and pillow insert and they will help you. If it helps, you can print out Sarah's directions. Most cleaners charge a very minimal amount for this type of service!
ReplyDeleteIt looks great!!!
ReplyDeleteEnvelope Pillow? How to pls
ReplyDeleteWow, LOVE these!! What a thrifty way to add some fall decor, and I may or may not have a throw pillow obsession, so this is perfect!
ReplyDeleteBecause inserts can be expensive I get pillows from thrift stores, usually $2 or $3 apiece and recover them in fabrics I love!
ReplyDeleteThis was brilliant; thank you for sharing!
ReplyDelete