A few of my favorite planting tips for planters and window boxes!
When you buy your hanging baskets or plants, you can make them look like a million bucks by just replanting them out of the cheap plastic containers and into your own.
Here are a few of my favorite tips for planting in outdoor containers.
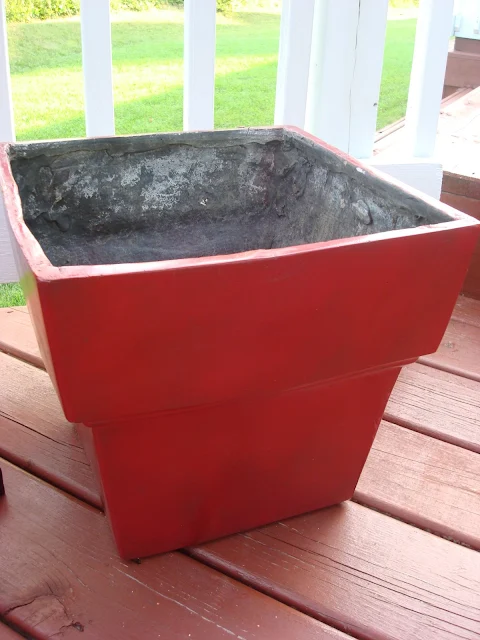
Spray paint worn out planters.

Yes, you can stain and/or spray paint outdoor containers! I've painted plastic, fiberglass and metal flower planters over the years, and all hold up beautifully.
Here's how these looked after a couple coats of red spray paint:

If your containers are in direct sun every day, you may have to touch them up more often. But overall you can give old planters a new life with just a few minutes of time.
Add more drainage.
Most of the time, your decorative pots will have holes on the bottom, but if they don't, or if you'd like to put more in them, all you need is a drill and a large drill bit:
 Just put a few holes in the bottom -- for plastic containers, any drill bit should work. These planters are a fiberglass kind of material, so I used one made for cement. I put five holes in the bottom of each.
As is mentioned, even if your planters have holes, you'll probably want to put a few more in. It never hurts to have a little more drainage.
Save money on potting soil.
Instead of buying a ton of expensive potting soil -- try this little trick to fill in the bottom of the planter.
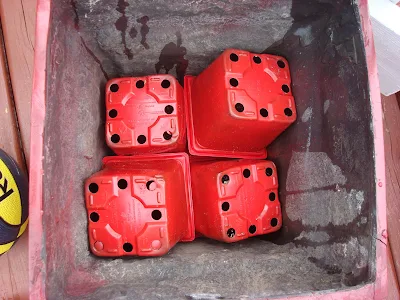
Before you put the soil in, put the old plastic planters in the bottom of the container first:

This is great for two reasons -- you'll use half the soil,
at least.
And they are soooo much lighter to work with when you're done. My grandma used to use charcoal on the bottom of her planters. I've also heard of using the foam packing peanuts. Those peanuts are expensive though -- so just use what you have!
I've also used styrofoam from packaging to fill in the bottom of my planters and window boxes.
Also, I've found there's no need to buy the expensive potting soil they put out right up front at the nursery -- go to the back and use the cheaper bags of regular soil. You can sprinkle some Miracle Grow into the soil while planting.
I've even used the cheaper top soil and mixed that in as well, and those are only a little more than a dollar a bag.
Put it in a prettier pot.
If your plant is a hanging basket, take the little clips off the planter first:

Then, to loosen the plant up to get it out, roll it around on it's side a few times. Then shake it a bit and it should come out easily:

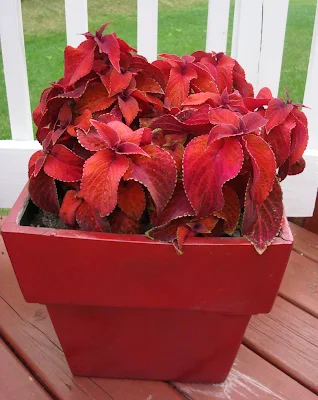
The great thing about this time of year is finding plants for cheap -- they are clearancing them out for the fall plants and you can find major deals. I found these Coleus plants at Menard's last for only $4 each.

Gorg! Hopefully they'll hang in there for a few more months!
Remember, fall is a great time to plant bushes and trees! The cooler weather lets the plants root well without the stress of heat. So keep in mind even as fall nears, you can still work on the landscaping for a couple more months.
 Yes, you can stain and/or spray paint outdoor containers! I've painted plastic, fiberglass and metal flower planters over the years, and all hold up beautifully.
 This is great for two reasons -- you'll use half the soil, at least.
  Then, to loosen the plant up to get it out, roll it around on it's side a few times. Then shake it a bit and it should come out easily:
 The great thing about this time of year is finding plants for cheap -- they are clearancing them out for the fall plants and you can find major deals. I found these Coleus plants at Menard's last for only $4 each.


From fixing holes to making them, Girl you got range! And you speak the truth when you say most planters need more. This year we have had an abundance of rain and I lost some flowers due to poor drainage.
ReplyDeleteThanks for sharing and have a blessed day!
How beautiful! I love red and this combination was unexpected :)
ReplyDeleteVery pretty plant! :)
ReplyDeleteI adore the vibrant red.
Love it...Those are one of my favorites we got one @ Home Depot for $2.oo and it was half dead but is now close to 3 feet tall and beautiful!
ReplyDeleteLooks great! I'm glad you gave me the idea of using the small planters in the bottom. I wanted to plant some mums in a bigger pot but didn't want to fill it completely with dirt.
ReplyDeleteOh! That is pretty! But I love almost anything red!
ReplyDeleteAs for planting in the Fall, it works because the ground is warmer (you don't have to wait for the snow to melt) and that typically gives you more time. So the roots have a longer time to get established before winter hits, where in the spring, if you have a late frost, you don't have as much time before the summer sun gets ya.
But of course, Spring is still the best. And in AZ we don't have Spring OR Fall, so it really doesn't matter! :P
I love the red leaves with the red pot! Very late-summer-fallish! Thank you for the tip about using cheap plastic nursery pots as filler in large pots. I have one large pot that I didn't plant this year because I didn't want to pay for that much dirt. So it is just collecting spiderwebs on the front porch ;-)
ReplyDeleteSo pretty! I can't believe you found those at Goodwill. They are so amazing! Wonderful project!
ReplyDeleteXOXO
Jen
Love all you ideas!!! Now this one I can try before I get out of my rental!!!
ReplyDeleteI should be sleeping, but saw your post and had to come on over and tell you that that looks fantastic! Of course, I don't have anything "live" on my decks...my dogs would eat it, but LOVE IT!
ReplyDeleteA long time ago, when I was a very young SAHM, I used empty soda cans for the bottom of the pots. Whatever you use is really a life saver, especially when you are the only one around during the week to move the pots to where they need to go.
ReplyDeleteI love coleus! They come in so many colors, fill in beautifully and play nice with other plants. I did some in a pot on my driveway between the two garage doors.
I think coleus is gorgeous. I only wish it were a perennial here. I spray painted my porch pots red, too. With red - I'm like a moth to a flame. Anyway...I just got a knock-out rose at Menards for $3.00. Yay! They are supposed to be the best rose bush due to disease/pest resistance and a super long bloom season. You're right about the great deals this time of year - as long as the store has kept their plants watered, anyway. Kudos to another great project!
ReplyDeleteGreat tips, Sarah! You clearly know much more than I do b/c I had no idea what kind of plant that was. I love it in your *new* planter though. :) I would never have thought to fill the bottom with the plastic planters.
ReplyDeleteIf you have a chance today (Fri.), stop by...I have that fun "announcement" I told you about up after the giveaway winner's name.... :)
Love the filler idea... efficient & cost effective! Also, on the coleus... I have the lime green variety, just pinching back some of the new buds has made it HUGE. It flows out of my front porch pots. You will love it!
ReplyDeleteI have got to remember when I go looking at thrift stores, and yard sales. Spray paint works miracles.
ReplyDeleteLove that you used filler in the bottom. I will have to try that.
ReplyDeleteColeus is my favorite! They grow nice on my sunless porch. I brought some inside too, they root in water fast!
ReplyDeleteFabulous! Thanks for the great tips. Using something to "fill" the bottom makes so much sense! Love your blog!
ReplyDeleteGreat idea with the plastic containers...never thought of using those to fill up the "bare" space! I use packing peanuts, and I'll tell ya, it was windy and they went all over the backyard...no fun to clean up!
ReplyDeleteHave a wonderful weekend!
Hugz,
Michele
The red looks gorgeous.
ReplyDeleteDon'tcha just lurve diggin' in the dirt? Your planters turned out FABOOSH!!!!! Love them!
ReplyDeleteJules :)
Oh you will love the Coleous! I have two big pots and they have doubled in size in just over 1 month! And great pots for your new deck!
ReplyDeleteLov'em Girl!
Great rehab! Coleus usually does really well (at least here in TX it seems to stand up well to the climate).
ReplyDeleteGood idea about using the plastic containers in the bottom of the pot. I've used crushed up soda cans, bunched up newspapers/junk mail and also crushed plastic bottles.
How'd you get so smart? What a good idea to use those little plastic pots as the "filler" in the bottom of planters. I've always used gravel, which works well, but darn! are the planters heavy!
ReplyDeleteI can't believe you got those planters for so cheap. I guess there are just lots of people out there who still haven't heard of spray paint. Lucky for us, huh?
Glad to see you publish your new rates! This is still the best deal around, so it's a great thrifty buy for your clients!
Love the plant color with the pot. Looks great!
ReplyDeleteThey look amazing. Great job. Also, I wanted to invite you to participate in my giveaway. It started today and it will go on until Monday. Good Luck!
ReplyDeletei have such high hopes for myself every year, but alas...I have a big ol' black thumb!
ReplyDeleteI love this color combo!
ReplyDeleteAlso the time for planting peonies and if the world is full from them next May as a result of this comment I will be happy forever!
ReplyDeleteSweet! I have so many projects...so little time..Im sure we all feel that from time to time. Have a great one my friend~
ReplyDeleteLove it! I'll be curious to see what your track backs are with that post title ;) I'm having a giveaway, stop by if you get a chance!
ReplyDeleteI don't know why I never thought to just drill holes in the bottom of planters that don't have them. I picked up a cute planter for .25 @ a yard sale and was bumbed to get it home and find no holes. It's just sitting outside with no flowers. DuH!!! :)
ReplyDeleteWow it turned out great!!
ReplyDelete:) T
Beware Coleus can become an addiction. I've had mine for about 4 years now. I've planted a shade coleus garden for two years. There are so many to choose from! Ahhhh.
ReplyDeleteThey love pots. I have taken them indoors for the winter and they do Ok but when it warms in the spring take them back out and they will just flourish before your eyes.
I didn't do the empty plastic pots in the bottom of planters trick when I first planted my two BIG planters in my old house. Then we moved and those sucker were HEAVY because they were filled top to bottom with dirt.
ReplyDeleteNice ideas here. We have had some folks over at ReUseConnection (http://bit.ly/aDNxdv ) ask what they can do with crushed cans and styrofoam. Many people answered that you can put them in the bottom of potted plants. They make the pots lighter and fill up space. . .
ReplyDeleteCheers, Ian