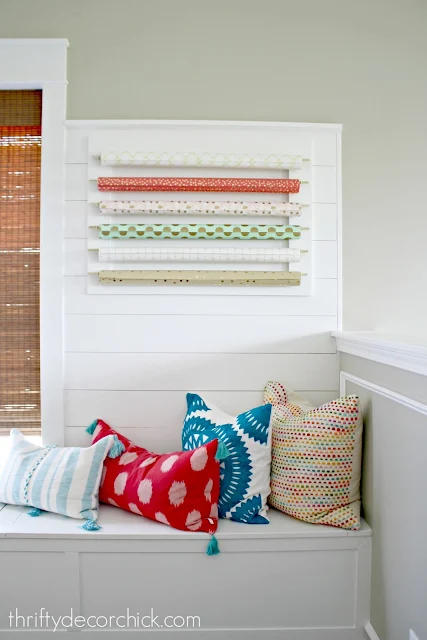
How to make a wall wrapping paper station
July 29, 2016
Share this
Hey there! We've had a busy week soaking up some summer activities…our time off is coming to a close soon. This week alone we visited the Indy Children's Museum, explored downtown, saw a movie and took a trip to Kings Island. Such a blast but I'm ready to relax a bit today! (If you are interested in visiting our fun city, check out this post and this one for my tips and our favorite places.)
I'm back today with a quick and easy project that I finished up in the loft last week. I'm pretty excited about it! Last time I shared this space I had this empty space above the window seat:
I've known all along exactly what I wanted to put there -- a gift wrap station. :) I'm all about form and function and I knew this would be cute and serve a purpose in this space.
I hardly spent anything on this because I used old trim from this room for the frame. You can definitely put this directly on the wall but I wanted to make a little bit more of a statement and I had the trim anyway.
I had plenty of wall space but didn't want it to go too low -- that corner is already my favorite spot on the window seat and I didn't want to worry about hitting my head. :) Turns out you can fit quite a few rolls in a small space. I ended up with 24 inches tall by about 34 wide:
Most gift wrap is 30 inches wide but Christmas wrapping is sometimes wider so that will just depend on your needs.
I nailed the trim directly on the planks and then cleaned it up -- putty for the corners and holes and a couple coats of semi gloss paint:
The next part was super easy. I picked up some dowel rods in the 3/8 size (again, any size will do, just make sure they don't bow with the weight of the paper):
And a couple packages of gold cup hooks:
Make sure your rods will fit in the hooks! Mine were 7/8 inches so it worked perfect.
I did some trial and error to decide on the layout -- I knew I wanted six up there so I measured out every 3.5 inches. I held my measuring tape up and marked those distances down the length of the trim, making sure each one was in the middle:
Make sure you do the exact same measurements on the other side. Then you've got yourself a super cute display that functions great as well:
OH I just love it!! So cute! Of course I got it up and decided I needed a few new rolls of paper to make it even cuter. :) I couldn't resist.
I love the pops of color against the white wall. I'm starting to love how everything kind of "sings" against white. I don't think all white would ever happen in our house but I can tell I'm going to like it in this space:
To access the paper I can either pull the wrapping out from the wall and cut it where it is, or it's easy to take them down. I will probably just take them down when I need them.
All in all this was only a $10 project since I had the trim, and as I mentioned, that's optional anyway.
Not gonna lie, I'm already thinking about how cute it will look with Christmas paper! :)
There you go -- a simple, inexpensive project that you can adjust to your needs. I absolutely love mine and am happy I was able to put that space to use.
Have a great weekend my friends! :)
Affiliate links included for your convenience!


Love how it turned out. Cute and functional.
ReplyDeleteSuch a cute idea!!
ReplyDeleteSo pretty and practical! It looks like wall art. Love it!
ReplyDeleteIf this is in your loft, can you see the wrapping paper from your living room? Just curious...
ReplyDeleteJust a bit of it but you'd really have to look.
DeleteYou know anything wrapping has my heart...this looks so happy here! If only I could pare my hoard down to only a few rolls, but alas - Marie Kondo said it it sparks joy it can stay ;) #PrettyPaperForevah This space is looking so freaking awesome and you're not even done yet!!
ReplyDeleteThis is really cute, functional and easy. I have an unfinished part of our basement with the studs exposed. I have all "the stuff" but this would be so easy to hang up on the wall. Heading to Depot this weekend! thanks! I never thought to get my wood dowels at depot.. cheaper than Michaels I'm guessing. Laura notatrophywife.com
ReplyDeleteReally cute and EASY!!!Love!
ReplyDeleteLove the bright and cheerful colors and how they pop off of all that crisp white trim! Looks like a great place to craft to me!
ReplyDeleteLooks like art!
ReplyDelete